If you have struggled integrating Google Analytics with Netsuite, you are not alone. It can be a bit tricky to get all the gears lined up. But, we have successfully done this twice – once pre-netsuite official method and now a modified version of the official way.
If you have not read through the Official Netsuite Google Analytics document on analytics integrations, here is the pdf. See page 356. Most of the information is correct – but I had come conversion issues with the code and it’s placement. Here is what I did to solve the issues with Netsuite’s Google Analytics integration problems.
Step 1:
Backup your current google analytics settings.
We have used tags for this in the past – so I backed up that tag and the confirmation page we were currently using. I just stick them in a text file and label the different sections so they could be accessed again later. I also try to use a date in the file name so I can have an archive.
Step 2:
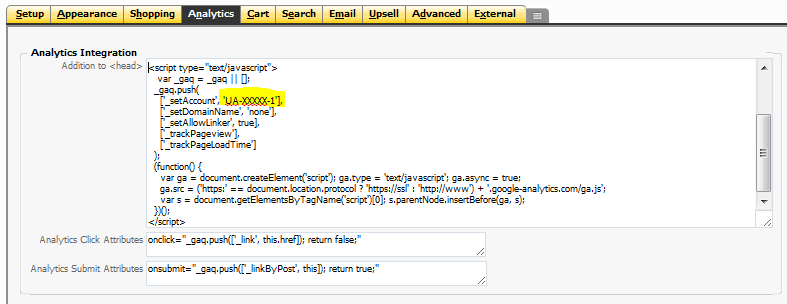
Login to Netsuite and go to Setup -> Web Site -> Set Up Web Site and then click the Analytics tab.

Here is the code from above:
  <script type="text/javascript">
    var _gaq = _gaq || [];
    _gaq.push(
      ['_setAccount', 'UA-XXXXXX-X'],
      ['_setDomainName', 'none'],
      ['_setAllowLinker', true],
      ['_trackPageview'],
      ['_trackPageLoadTime']
    );

    (function() {
      var ga = document.createElement('script'); ga.type = 'text/javascript'; ga.async = true;
      ga.src = ('https:' == document.location.protocol ? 'https://ssl' : 'http://www') + '.google-analytics.com/ga.js';
      var s = document.getElementsByTagName('script')[0]; s.parentNode.insertBefore(ga, s);
    })();
  </script>
You’ll need to replace the UA code with yours…also, not the Analytics Click and Submit Attributes – these need to be:
  onclick="_gaq.push(['_link', this.href]); return false;"
  onsubmit="_gaq.push(['_linkByPost', this]); return true;"
Step 3:
Now we need to add the confirmation code. You will find it in the “Order Tracking Script HTML” box on the same tab.

Here is the code needed in section above:
  <script type="text/javascript" src="https://ajax.googleapis.com/ajax/libs/jquery/1.4.2/jquery.min.js"></script>
  <script type="text/javascript">
    $(document).ready(function () {
      var skulist = '';
      var pricelist = '';
      var quantitylist = '';

      var orderNum = "<%=getCurrentAttribute('confirmation','ordernumber')%>";
        _gaq.push(['_addTrans',
        orderNum,                                                    // ordered
        '{sitename}',                                                // affiliation
        '<%=getCurrentAttribute('confirmation','subtotal')%>', // total/subtotal
        '<%=getCurrentAttribute('confirmation','tax')%>',      // tax
        '<%=getCurrentAttribute('confirmation','shipping')%>', // shipping
        '', // city
        '', // state
        '' // country
      ]);

      var rows = document.getElementById("ordersummary_total").parentNode.rows;

      for (var i = 0; i < rows.length; i++) {
        try {
          var skuName   = rows[i].cells[X].innerHTML;
          var qty       = rows[i].cells[X].innerHTML;
          var prodName  = rows[i].cells[X].innerHTML;
          var price     = rows[i].cells[X].innerHTML;

          price = price.replace(",","");

          if (price.indexOf("$") != -1) {
            price = price.replace("$", "");
            _gaq.push(['_addItem', orderNum, skuName, prodName, '{sitename}', price, qty]);
          }
        } catch(e) {}
      }
      _gaq.push(['_trackTrans']);
    });
  </script>
You will need to change the “{sitename}” to any identifier you wish. It will show up in Google Analytics.
Also – please note the “X“, this varies from site to site based on cart setup. An easy way to figure it out is look at your shopping cart page – it uses a zero based index to identify each element. So we use the Item Name/Code as SKU – so in the skuName variable above, we would use 0, the qty field here would be 1, prodname would be 2 and then price would be 3. 4 would not be used in this Netsuite integration.
Here is a picture to help explain:

Step 4:
Clearing out old Googel Analytics code. If you have previously had GA installed – then it will be necessary to clear out all the old code. As mentioned above, the Tag method may have been used in the past. If this is the case – you can make a backup copy of the Google Analytics tag and then clear the tag data.
Also – check the Checkout Tab. Tabs can be found under Lists -> Tabs in the main menu and many times have code in them. This is the code/text which is executed at the confirmation of the sale.
Conclusion
The issue I found was the order in which the elements ended up on the confirmation page. This is why I ended up using jquery and the document.ready – this way I know the page is fully loaded before trying to send the information about the purchase onto Google.
Good Luck
Integrating Google Analytics into Netsuite can be a bit intimidating, but with the Netsuite guide and this blog post – you should be on your way to clean tracking in Netsuite.
Please email if you have issues and I will help if I can.